

Table of Contents
- Understanding Sound Transmission in Basements
- Basement Ceiling Soundproofing Methods
- Addressing Floor Impact Noise and Footfall
- DIY Basement Sound Dampening Hacks
- Cost of Soundproofing a Basement
- Sealing Air Leaks and Flanking Paths
- Managing HVAC and Structural Noise During Renovation
- Retrofitting Finished Basements for Noise Control
Understanding Sound Transmission in Basements
Sound travels in two primary ways: airborne noise (voices, music, traffic) and impact noise (footsteps, vibrations, structural movement). Basements present unique acoustic challenges because they’re partially below grade, often share walls with adjacent spaces, and contain mechanical systems that generate low-frequency vibrations. When you’re planning a basement renovation, controlling these two noise types requires different approaches.
Airborne sound moves through the air and passes through gaps, cracks, and weak points in your structure. Impact noise travels through solid materials, it’s what you hear when footsteps transmit down from the floor above or when HVAC vibrations shake the ceiling. The distinction matters because the materials and techniques that stop airborne noise don’t necessarily stop impact noise, and vice versa.
During a basement renovation noise reduction project, you’ll typically address both simultaneously. The goal isn’t complete silence, it’s reducing sound transmission to a level where the space functions as intended. A home theater needs more aggressive treatment than a guest bedroom. A gym requires impact noise control. A workshop might need primarily airborne isolation.
Start by identifying which noise problem is most pressing. Footfall from above? Furnace rumble? Voices from adjacent spaces? Your treatment strategy depends on which you’re solving first.
Basement Ceiling Soundproofing Methods
The ceiling is your primary target for basement renovation noise reduction because it’s the largest surface area between your space and the floor above. Most basement ceilings are simple drywall suspended from joists, excellent sound transmitters. Upgrading them requires adding mass, breaking vibration paths, or both.
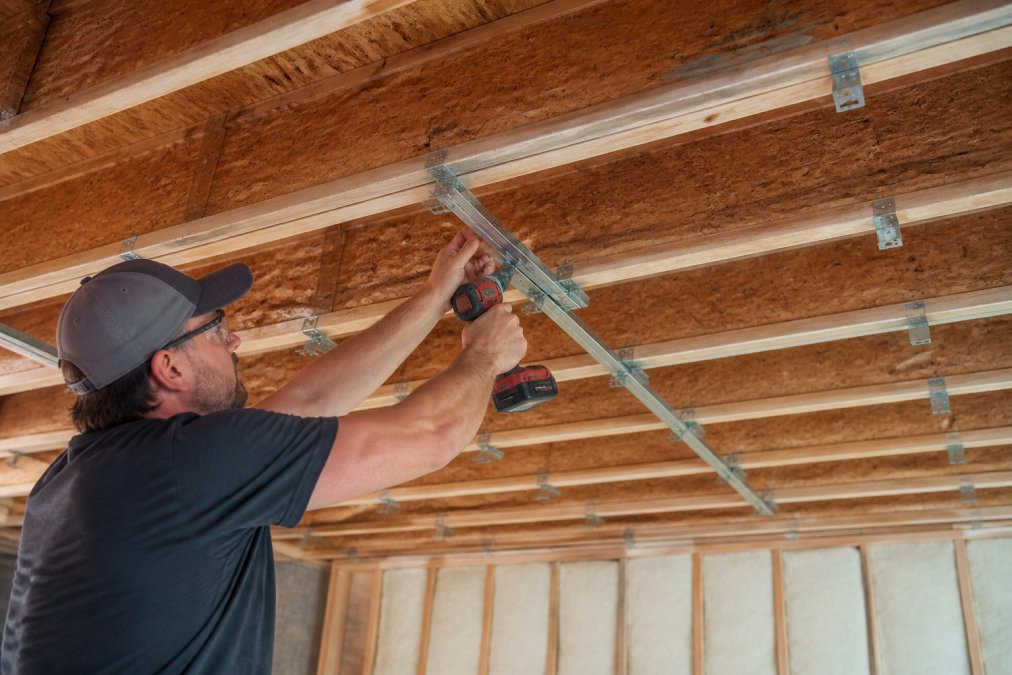
Double Drywall Installation
Double drywall creates mass and adds an air gap that interrupts sound transmission. The technique is straightforward: install a first layer of drywall to the joists, then add a second layer with resilient channels or clips between the two layers. This decoupling prevents the second layer from vibrating in sync with the first.
The installation process takes time. You’ll frame out the ceiling, run electrical and HVAC as needed, install the first drywall layer, add your sound isolation system, then install the final drywall layer. When done properly, double drywall reduces sound transmission significantly compared to single-layer installation.
Spacing matters. Leave at least a half-inch air gap between layers. Thicker drywall (5/8-inch instead of 1/2-inch) adds more mass and improves performance. Some contractors use acoustical drywall designed specifically for sound dampening, though standard drywall performs adequately when combined with proper installation techniques.
Resilient Channels and Sound Isolation Clips
Resilient channels are metal tracks that decouple drywall from framing. They’re mounted perpendicular to joists, and drywall attaches to the channels rather than directly to the structure. This breaks the vibration path, sound vibrations in the framing don’t directly transmit to the drywall.
Sound isolation clips work similarly but use spring-loaded mechanisms that provide more vibration isolation than channels alone (peer-reviewed research). They’re more expensive and more effective. For serious basement renovation noise reduction, clips outperform channels, but channels provide solid performance at lower cost.
Installation requires precision. Channels must be spaced consistently (typically 24 inches on center) and fastened securely to the framing. Drywall fastens to the channels only, never to the framing behind. A single fastener connecting drywall directly to the joist creates a sound bridge that defeats the isolation system.
The most common installation mistake is fastening drywall to both the channels AND the framing. This completely bypasses the isolation system. Use fasteners long enough to penetrate the channel but short enough to stop before reaching the joist behind.
Mass-Loaded Vinyl Applications
Mass-loaded vinyl (MLV) is a dense polymer material that adds mass to walls and ceilings without significant thickness. It’s typically 1/8-inch thick and comes in rolls. When applied beneath drywall, it increases sound transmission loss across a broad frequency range.
MLV works best as a layer within a multi-component system rather than as a standalone solution. Apply it directly to the joists or framing before installing drywall, or sandwich it between two drywall layers. The material itself doesn’t vibrate much because of its density, so it absorbs some energy while adding mass that’s harder for sound to move through.
Quality varies significantly. Thicker, denser products perform better than thin, lightweight versions. Installation requires sealing seams with acoustic sealant, gaps and unsealed joints undermine the entire system. For basement renovation noise reduction, expect to spend more for premium MLV than budget alternatives.
Addressing Floor Impact Noise and Footfall
Impact noise from footsteps above becomes a problem when the floor structure lacks isolation between the subfloor and the ceiling below. The vibration path is direct: foot hits floor, energy transfers through subfloor and joists, and reaches your basement ceiling. Interrupting this path requires underlayment, decoupling, or vibration damping.
Underlayment and Subfloor Solutions
Underlayment installed above the subfloor reduces impact noise transmission. Cork, rubber, and engineered foam products all work, though they perform differently. Cork provides moderate impact isolation and some sound absorption. Rubber offers superior vibration damping. Foam varies widely depending on density and composition.
The key is installing underlayment between the subfloor and finished flooring (carpet, laminate, hardwood). When you’re renovating a basement, you control this layer. Above-grade renovations are harder because homeowners often don’t want to replace existing flooring. In a basement, you’re typically starting fresh, so adding quality underlayment is straightforward.
Thickness matters. Thicker underlayment provides better isolation, but diminishing returns set in around 1/2-inch (astm.org). Installation must be continuous, gaps create pathways for vibration to bypass the underlayment. Seams should be taped or sealed depending on the product.
Vibration Damping Techniques
Vibration damping materials convert mechanical energy into heat. Green Glue is the most recognized product in this category, it’s a viscoelastic compound that you apply between layers of drywall or other materials (peer-reviewed research). As sound vibrations move through the material, the compound dissipates energy.
For basement renovation noise reduction targeting impact noise, apply damping compound between subfloor and joists if you have access, or between ceiling materials in the basement. The material works best when constrained between two rigid layers. Loose application or exposure to air reduces effectiveness.
Installation is labor-intensive but straightforward. You apply the compound in a grid pattern (typically one cartridge per 16 square feet), then install the second layer of material on top. The pressure from the upper layer activates the damping properties. Proper application requires patience and attention to coverage.
Impact noise reduction requires attacking the problem at the source, the floor structure above. Ceiling treatments help but work best combined with floor-level solutions like underlayment and damping.
DIY Basement Sound Dampening Hacks
Not every noise control solution requires professional installation or expensive materials. Several approaches work well for DIY basement renovation noise reduction projects, particularly when you’re targeting specific problem areas rather than treating the entire space.
Acoustic panels absorb airborne sound effectively. They’re fabric-wrapped fiberglass or foam panels that mount to walls. They don’t reduce sound transmission between spaces, but they reduce echo and reverberation within your basement. For a home theater or music room, they’re essential. Installation is simple, mount them with adhesive or mechanical fasteners.
Bookshelves and furniture act as acoustic treatments. A full bookshelf absorbs more sound than an empty wall. This doesn’t solve structural sound transmission problems, but it improves acoustics within the space. Layer books and vary the spacing rather than packing everything tightly.
Weatherstripping and door seals address air leaks around doors and windows. Sound travels through gaps. Sealing these openings with weatherstripping, door sweeps, and acoustic caulk reduces transmission. A properly sealed door is significantly more effective than an unsealed one.
Heavy curtains and rugs reduce echo and absorb some airborne sound. They’re not soundproofing solutions, but they’re inexpensive and easy to install. Thicker, heavier materials work better than lightweight options.
Cost of Soundproofing a Basement
Basement renovation noise reduction costs vary dramatically based on scope and methods. A simple project might involve acoustic panels and weatherstripping. A comprehensive treatment adds resilient channels, double drywall, mass-loaded vinyl, and professional installation.
Material costs depend on your choices. Acoustic panels run from budget-friendly to premium. Resilient channels and clips cost more than simple framing. Mass-loaded vinyl prices vary based on thickness and quality. Professional installation adds labor costs but ensures proper execution.
For a detailed estimate specific to your basement, the best approach is consulting with professionals who can assess your particular noise problems and recommend targeted solutions. Different basements have different needs, and treating unnecessary areas wastes money.
DIY approaches work best for smaller spaces or targeted problems. Whole-basement treatment typically benefits from professional installation to ensure proper system integration.
Sealing Air Leaks and Flanking Paths
Sound leaks through gaps and cracks just like air does. A perfectly sealed wall with gaps around the perimeter performs poorly because sound takes the path of least resistance. Identifying and sealing flanking paths is critical for effective basement renovation noise reduction.
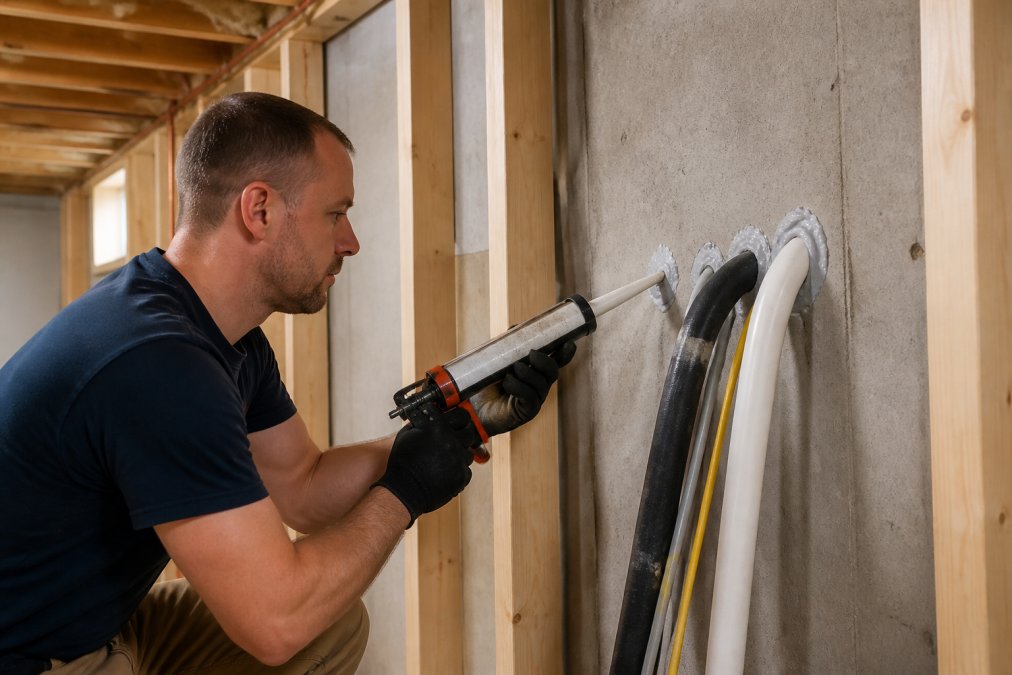
Common flanking paths include gaps around pipes, electrical conduits, HVAC ducts, and structural penetrations. Seal these with acoustic caulk or spray foam designed for sound control. Standard caulk works but acoustic caulk remains slightly flexible and maintains its sealing properties better over time.
Window and door frames create flanking paths if not properly sealed. Install weatherstripping and acoustic seals around frames. Gaps above suspended ceilings (if you’re not boxing them in completely) allow sound to travel around your treatment. These require special attention during installation.
Electrical outlets and light switches in exterior walls create small but significant sound leaks. Gaskets behind outlet covers seal these gaps. It seems minor, but multiply the effect across dozens of outlets and the cumulative impact becomes meaningful.
The sealing process requires attention to detail. Walk the perimeter of your treated space and identify every penetration. Seal systematically. Acoustic sealant costs little compared to the overall project, so erring on the side of over-sealing is prudent.
Managing HVAC and Structural Noise During Renovation
HVAC systems generate noise through multiple pathways: airflow noise through ducts, vibration from mechanical components, and sound transmission through ductwork. During a basement renovation, addressing HVAC noise requires duct isolation and vibration control.
Flexible ductwork isolates vibration better than rigid metal ducts. Where possible, use flexible sections to connect the main trunk lines. Vibration isolation hangers support ductwork without transmitting vibration directly to the structure. These specialized hangers cost more than standard hangers but significantly reduce noise transmission.
Duct wrapping with fiberglass or acoustic material reduces airflow noise. Wrap ducts that run through your finished basement space. This is particularly important for return air ducts, which can transmit noise from one room to another.
Structural noise, creaks, pops, and movement sounds, comes from wood framing responding to temperature and humidity changes, or from structural movement under load. Isolation between floors reduces this transmission. Your ceiling treatment system addresses this by decoupling the basement ceiling from the floor structure above.
For complex HVAC work or concerns about structural issues, professional consultation ensures proper installation. Improper HVAC modifications can create comfort problems or code violations.
Retrofitting Finished Basements for Noise Control
If your basement is already finished but has acoustic problems, retrofitting is more challenging than treating during renovation. You can’t easily access the joist cavity or install new underlayment under existing flooring. However, several approaches work for existing spaces.
Acoustic panels on walls address reverberation and airborne sound within the space. They’re the easiest retrofit solution and provide immediate improvement in acoustics. They don’t solve structural sound transmission from above, but they improve the acoustic environment.
Removing drop ceilings and installing a new acoustic ceiling with isolation clips improves performance over existing dropped ceilings. This requires some structural work but is less invasive than removing finished drywall.
Adding a second layer of drywall to existing walls increases mass and and can include resilient channels for isolation. This reduces wall thickness and requires relocating outlets and switches, but it’s feasible in retrofit scenarios.
Sealing air leaks around existing penetrations, doors, and windows is the most cost-effective retrofit approach. Many existing basements have poor sealing, and improving it provides noticeable improvement.
For serious acoustic problems in finished basements, a professional assessment identifies which approaches will deliver the most impact for your specific situation. Berry Basements can evaluate your space and recommend targeted solutions that work within your existing structure.
Basement renovation noise reduction doesn’t require choosing between comfort and functionality. The right combination of materials and techniques creates a quiet, usable space that doesn’t disturb the rest of your home. Whether you’re treating a new renovation or retrofitting an existing basement, starting with a clear understanding of your noise problems guides you toward solutions that actually work.
The complexity of your project, managing HVAC systems, working around existing plumbing, ensuring proper structural support, makes professional guidance valuable. Berry Basements brings experience from years of basement projects, understanding how to integrate noise control with all the other demands of a finished basement. A free estimate helps clarify what’s realistic for your space and budget, and our collaborative approach ensures the final result meets your vision for how you’ll use the space.
Frequently Asked Questions
Q: How can I soundproof an already finished basement?
A: Retrofitting finished basements requires strategic additions without major deconstruction. Add mass-loaded vinyl behind existing walls, install acoustic panels on ceilings and walls, seal air leaks around pipes and electrical outlets with acoustic sealant, and use resilient channels on the ceiling to decouple drywall from joists. These methods reduce sound transmission class (STC) ratings and address both airborne and impact noise without removing finished surfaces.
Q: What is the cheapest way to reduce noise through basement walls?
A: Acoustic sealant and weatherstripping are the most cost-effective first steps, addressing flanking paths where sound leaks through gaps. Mass-loaded vinyl is affordable compared to full wall reconstruction and can be applied over existing surfaces. Batt insulation in joist cavities provides decent sound absorption at low cost. For maximum impact without major expense, combine these three: seal all penetrations, add MLV, and insulate cavities. Professional installation ensures proper application and better results than DIY approaches.
Q: What are the best materials for dampening sound in a basement ceiling?
A: The most effective basement ceiling soundproofing methods combine decoupling with mass and absorption. Resilient channels decouple drywall from joists, reducing vibration transmission. Double drywall layers add mass to block airborne noise. Mass-loaded vinyl acts as a sound barrier. Batt insulation in joist cavities absorbs sound energy. Green glue between drywall layers provides vibration damping. For maximum noise reduction, use all four: resilient channels, double drywall with green glue, MLV, and insulation. This approach reduces impact noise from footfall and structural vibration significantly.
Q: How much does basement soundproofing typically cost?
A: The cost of soundproofing a basement varies based on room size, ceiling height, existing conditions, and material choices. Professional installation of resilient channels, double drywall, and insulation costs more than DIY sound dampening hacks using acoustic panels and sealant. Retrofitting finished basements costs less than full renovation with decoupling. Pricing depends on material quantities, labor rates, and project scope. For an accurate estimate tailored to your specific basement layout and noise reduction goals, contact Berry Basements for a free consultation.
This article was written using GrandRanker