

Table of Contents
- 1. Recessed Lighting and Dimmable Fixtures for Dark Basements
- 2. Modern Basement Layout Design Ideas for Multi-Purpose Rooms
- 3. Under-Stair Storage Solutions
- 4. Moisture Barriers and Waterproofing for Basement Protection
- 5. Luxury Vinyl Plank Flooring for Durability and Moisture Resistance
- 6. Color Schemes and Accent Walls to Maximize Space Perception
- 7. Small Basement Finishing Cost: Budget-Friendly vs. Professional Renovation
- 8. Guest Bedroom and Home Office Conversions
- Frequently Asked Questions
Last Updated: September 28, 2026
Basements are often underutilized, but with thoughtful design, you can transform a dark, unfinished space into functional living area. These 10 basement finishing ideas for small spaces show how strategic planning and smart material choices make even tight basements feel open, inviting, and valuable.
The key to success isn’t bigger budgets, it’s smarter design. Below are practical strategies for real basements with real constraints: low ceilings, moisture concerns, structural obstacles, and tight budgets.
1. Recessed Lighting and Dimmable Fixtures for Dark Basements
Basements lack natural light, making poor lighting a critical problem. Recessed lighting solves darkness without eating precious headroom.
Recessed lights sit flush with the ceiling, preserving headroom in small spaces. Pair them with dimmable technology to adjust brightness by function: bright for home offices, softer for bedrooms and entertainment areas.
Color temperature matters: warm white (2700K) for bedrooms and lounges, cool white (4000K) for workspaces. Zone your lighting, brighter in functional areas, softer in relaxation zones.
LED recessed lights use 75% less energy than incandescent bulbs and last 25+ times longer. The upfront cost is higher, but they pay for themselves quickly in a space you’re lighting regularly.
Layer lighting with accent lights, task lighting, or smart bulbs for flexibility throughout the day.
2. Modern Basement Layout Design Ideas for Multi-Purpose Rooms
Smart layout design lets small basements serve multiple purposes. Create distinct zones without walls, which would shrink the space further.
Functional Zoning Without Walls
Zoning uses furniture placement, flooring changes, lighting, and color shifts, not walls, to create functional areas while maintaining visual openness.
Map your activities, then position furniture to define zones. A low bookshelf separates a home office from seating; a rug signals the entertainment zone. Lighting reinforces boundaries: bright over the desk, soft over seating.
Functional zoning adapts as needs change. Push furniture toward walls to maintain sightlines and a circulation path through the center.
Open Floor Plan Principles
An open floor plan with minimal walls and maximum visual flow makes small spaces feel larger.
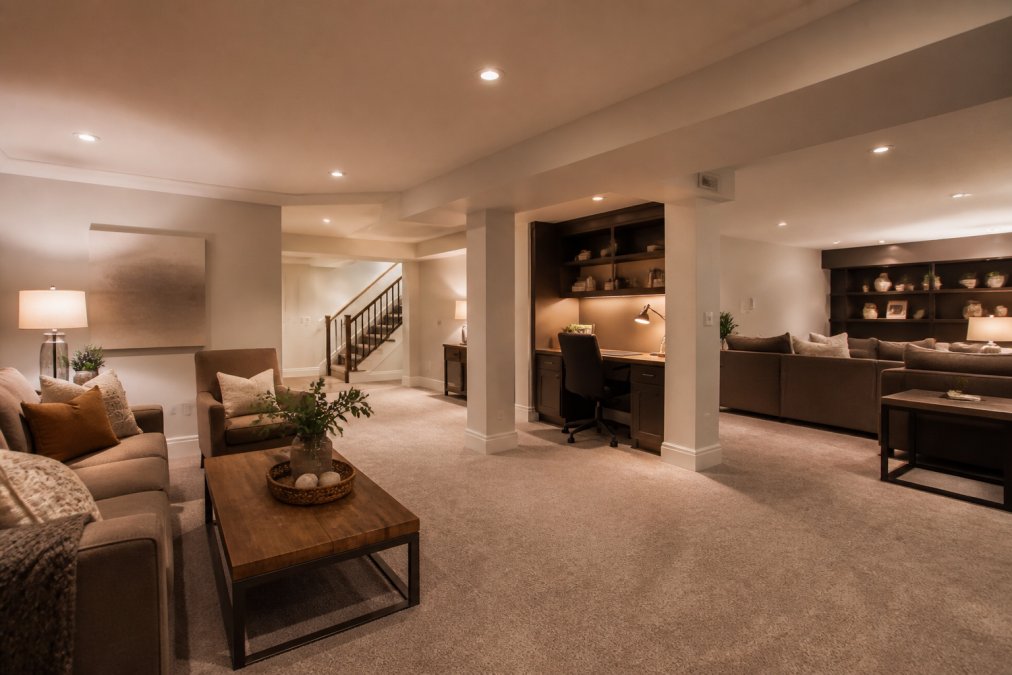
With low ceilings (under 8 feet), choose lower-profile furniture that sits closer to the ground. This reduces visual clutter and makes the ceiling feel higher.
Use light, neutral walls (soft whites, pale grays, warm beiges) to expand perceived space. Save bold colors for single accent walls.
3. Under-Stair Storage Solutions
If your basement has a staircase, the space underneath is prime real estate for storage. This area is often wasted, but it’s ideal for built-in shelving, drawers, or closed cabinetry that keeps clutter out of sight.
Under-stair storage maximizes square footage without taking up additional floor space. Open shelving works if your basement is organized; closed cabinets are better if you want a clean aesthetic. Custom-built solutions are ideal because they fit the unique angles and dimensions of the staircase. Off-the-shelf options are budget-friendly but may not use the space efficiently.
Consider what you’re storing. Seasonal items, tools, and supplies work well in under-stair storage. Keep frequently accessed items in the front and easy-to-reach spots. Deep storage bins with labels prevent the “black hole” effect where items disappear and are never found again.
Professional contractors like Berry Basements can design under-stair storage that looks polished and intentional, not like an afterthought. The investment pays off in recovered square footage and a more organized basement.
4. Moisture Barriers and Waterproofing for Basement Protection
Moisture is the enemy of basement finishing. Water intrusion damages flooring, drywall, and finishes, and it creates conditions for mold growth. Before you install any flooring or wall coverings, address moisture at the source.
A moisture barrier is a protective layer, typically plastic sheeting or specialized membrane, installed between the subfloor and your finished flooring. It prevents ground moisture from wicking up through concrete and damaging your new floors. This is non-negotiable in basements, especially in areas prone to humidity or water intrusion.
Waterproofing goes deeper. Exterior waterproofing involves sealing cracks in the foundation and installing drainage systems outside the home. Interior waterproofing includes sump pumps, dehumidifiers, and sealants on interior walls. A professional assessment determines what your specific basement needs.
Many homeowners skip or minimize waterproofing to save money, then regret it when moisture problems emerge. This is one area where cutting corners backfires. A finished basement that develops water damage is expensive to repair and can become a health hazard if mold takes hold.
Finishing a wet basement without addressing moisture first is a recipe for costly damage and mold. Professional waterproofing assessment should happen before any finishing work begins.
5. Luxury Vinyl Plank Flooring for Durability and Moisture Resistance
Flooring is one of the most visible and functional elements of a finished basement. Luxury vinyl plank (LVP) is the smart choice for basements because it’s waterproof, durable, and looks like real wood without the moisture vulnerability.
LVP consists of multiple layers: a waterproof core, a photographic layer that mimics wood or stone, and a protective wear layer. The waterproof core is the key advantage in basements. Unlike hardwood, which swells and warps with moisture, LVP is impervious to water. Even if your basement floods, LVP survives intact.
Installation is straightforward with a click-lock system that doesn’t require adhesive. Many homeowners handle LVP installation themselves, which saves on labor costs. The flooring sits on top of a moisture barrier, creating a complete waterproofing system from subfloor to finished surface.
LVP comes in dozens of wood-look and stone-look finishes. You can achieve the aesthetic of expensive hardwood or natural stone at a fraction of the cost. It’s also easier to clean and maintain than porous natural materials, which matters in a basement where dust and moisture are concerns.
6. Color Schemes and Accent Walls to Maximize Space Perception
Color is one of the most powerful tools for making a small basement feel larger and more inviting. Light, neutral colors reflect light and create an airy feel. Dark colors absorb light and make spaces feel smaller and more enclosed.
For walls, stick with soft whites, pale grays, warm beiges, or light blues. These colors expand the perceived space and provide a calm backdrop for furniture and decor.
7. Small Basement Finishing Cost: Budget-Friendly vs. Professional Renovation
Basement finishing costs vary wildly depending on scope, finishes, and whether you hire professionals or go the DIY route. Understanding the trade-offs helps you make decisions that align with your budget and timeline.
DIY Approaches to Keep Costs Down
DIY finishing works for simpler projects: painting, installing LVP flooring, building shelving, or adding lighting fixtures. If you have basic carpentry and electrical skills, these tasks save thousands in labor costs.
When Professional Finishing Adds Value
Professional contractors handle the complex, code-dependent work: moisture barriers, HVAC integration, plumbing for a kitchenette or bathroom, structural modifications, and permit compliance. These tasks require expertise and licensing.
| Approach | Cost | Timeline | Best For | Trade-offs |
|---|---|---|---|---|
| Full DIY | Lowest | Longest | Simple cosmetic updates | Mistakes can be costly; time-intensive |
| Hybrid (DIY + Professional) | Medium | Medium | Combining simple and complex tasks | Coordination between DIY and pros |
| Full Professional | Highest upfront | Shortest | Complex renovations, code compliance | Higher cost but polished result |
8. Guest Bedroom and Home Office Conversions
Two of the most practical uses for a finished basement are a guest bedroom and a home office. Both maximize the utility of the space and add real value to your home.
Frequently Asked Questions
What are some inexpensive ways to finish a small basement?
Start with budget-friendly approaches like luxury vinyl plank flooring (around $3 per square foot installed), recessed lighting instead of expensive fixtures, and DIY drywall finishing on non-structural walls. Under-stair storage uses existing space without added cost. Built-in shelving from stock materials and strategic accent walls create definition without major investment. Paint, proper ventilation, and a dehumidifier address moisture concerns affordably. For complex work like egress windows or structural changes, professional guidance prevents costly mistakes.
How can I make a small basement feel larger with basement finishing ideas?
Light colors on walls and ceilings reflect light and create an airy feeling. Recessed lighting and dimmable fixtures brighten dark spaces without visual clutter. An open floor plan layout using functional zoning instead of walls maximizes perceived square footage. Vertical shelving draws the eye upward, making ceilings feel higher. Mirrors strategically placed amplify natural light from egress windows. Avoid dark accent walls in tiny spaces; use them sparingly on one feature wall instead.
What is the average cost to finish a small basement with modern layout design?
Costs vary significantly based on scope and location. Basic finishing with drywall, flooring, and lighting runs lower than projects requiring waterproofing, HVAC extensions, plumbing for a kitchenette, or egress window installation. Professional contractors manage complex structural changes and permit requirements that DIY approaches can’t handle safely. For an accurate estimate tailored to your specific basement layout and requirements, contact a licensed contractor for a free consultation and quote.
Do I need an egress window in a finished basement bedroom?
Yes, building codes require egress windows for any bedroom in a basement. An egress window must open to at least 5.7 square feet (or 5 square feet if it’s the only exit) and provide a clear path to ground level for emergency escape. This is a legal safety requirement, not optional. Installation involves structural changes to the foundation, so professional handling is essential. Check local building codes with your city or county before planning a basement bedroom conversion.
What moisture solutions should I implement before finishing my basement?
Install a moisture barrier on walls and under flooring to prevent water damage and mold growth. A dehumidifier keeps humidity below 50-60%, which protects finished spaces and stored items. Ensure proper grading outside the foundation and consider interior or exterior waterproofing if you’ve had past moisture issues. Luxury vinyl plank flooring with attached underlayment resists basement humidity better than traditional options. Trusscore Wall&CeilingBoard is mold-resistant and designed specifically for below-grade environments. Address water intrusion before finishing; don’t cover existing moisture problems.