

Table of Contents
- Why a Dark Basement Is Worth Transforming (and What It Really Takes)
- Moisture Control for Basement Renovations: Fix Water First
- Modern Basement Layout Design Ideas That Make Small Spaces Feel Big
- Basement Egress Window Requirements and Building Permits
- Lighting and Finishes That Brighten a Dark Basement
- Budgeting, ROI, and Acoustic Comfort
- Conclusion: Your Dark Basement Can Become Your Favorite Room
- Frequently Asked Questions
Last Updated: September 14, 2026
Why a Dark Basement Is Worth Transforming (and What It Really Takes)
Transforming a dark basement into living space is the highest-return move most homeowners can make: you convert square footage you already own and heat. At Berry Basements, we have handled waterproofing, framing, and finish work on these lower levels since 2017, and the pattern is always the same, the storage cave becomes the room the family fights over.
The honest version: a dark basement is not a lighting problem. It is a water, air, and code problem that happens to look dark. Fix those three and the brightness follows.
The work breaks into six phases, and skipping any one costs you later:
- Assess the space and set a purpose for it
- Solve moisture and waterproofing first
- Plan the layout around pipes, ducts, and beams
- Meet egress and permit requirements
- Layer lighting and choose finishes that reflect light
- Budget for acoustics and comfort, not just looks
Most guides start with paint colors. Start with a sump pump instead.
Moisture Control for Basement Renovations: Fix Water First
Moisture control for basement renovations means stopping water before it reaches your finished materials, using exterior drainage, interior barriers, and mechanical dehumidification together. Skip it and every dollar you spend on drywall is on a timer.
Concrete is porous and below-grade walls sit against wet soil, so water arrives three ways: bulk water through foundation cracks, capillary seepage through the slab, and humidity from the air. Each needs a different fix, sequenced before framing, not after.
Interior and Exterior Waterproofing Systems
Exterior systems manage water before it touches the wall. Interior systems manage what gets through anyway. A complete job usually needs both.
- Exterior: grading that slopes away from the foundation (roughly 6 inches of drop over the first 10 feet), clean gutters and downspout extensions that discharge at least 4 to 6 feet from the wall, and a footing drain that carries water to daylight or a dry well
- Interior: a dimple mat or vapor barrier against the wall, a perimeter drain channel, and a sump pump with a battery backup
- Structural: hydraulic cement or epoxy injection for foundation cracks, and carbon fiber straps or steel bracing if walls are bowing
The drawback of exterior work is cost and access: it means digging, and doing it before you frame. That sequencing is non-negotiable.
How the interior pieces work together:
- A dimple mat is a rolled plastic membrane with molded bumps that holds the wall finish about a quarter-inch off the concrete. Water weeping through the wall runs down the back of the mat into the perimeter drain instead of into your studs.
- A perimeter drain, a perforated pipe in a gravel trench or a channeled baseboard system on top of the slab, collects that water and slopes it to the sump pit.
- The sump pump discharges it outside, ideally where it drains away from the house. A battery or water-powered backup matters because the storms that overwhelm a sump are the same storms that knock out power.
If you have active seepage, address it before insulation and drywall. Retrofitting a drain later means cutting out finished walls.
Painting a masonry wall with a “waterproof” sealer traps moisture inside the concrete. The wall then spalls and the sealer peels within a season or two. Sealers are for above-grade block, not for a wall with active seepage.
Dehumidification and Air Quality
A dehumidifier is not a backup appliance. It is part of the system, and sizing it correctly is the difference between a dry room and a musty one. Below-grade air stays cool, and cool air holds less moisture, so relative humidity climbs even when nothing is leaking. Target roughly 50% relative humidity year-round.
Sizing rules of thumb that practitioners use:
- Portable units are rated in pints per day. For a single finished room in a moderately damp climate, a 30- to 50-pint unit is typical; for a whole open basement, 70 pints or more is common.
- Ducted or whole-home dehumidifiers are rated in pints per day at a specific temperature and humidity condition, and they tie into your HVAC so the whole level is conditioned, not just the corner where the unit sits.
- A condensate pump or floor drain is required, because a dehumidifier produces a steady stream of water that has to go somewhere.
Two things most people skip:
- Radon testing. Radon is a naturally occurring soil gas that concentrates in lower levels. Test before you close up walls, because remediation is far cheaper on an open floor plan. The EPA’s radon guidance for homeowners explains testing and mitigation options. If mitigation is needed, the standard approach is a sub-slab depressurization system: a PVC pipe runs from beneath the slab up through the roof, with an inline fan that pulls soil gas out before it enters the living space. Roughing in that pipe during the renovation is far cheaper than adding it later.
- Ventilation. A finished basement with closed doors and no air exchange gets stale. Tie the space into your HVAC or add a dedicated exhaust. A common approach is a small energy-recovery ventilator that brings in fresh air while tempering it against the exhaust air, which keeps the space from getting stuffy without dumping humid outside air into a cool room.
Test for radon in the heating season, when windows stay closed and the stack effect pulls more soil gas into the house. A short-term test kit is inexpensive and widely available; a long-term test gives a more reliable annual average.
Modern Basement Layout Design Ideas That Make Small Spaces Feel Big
Modern basement layout design ideas work when they treat the ceiling plane and the traffic path as the two most valuable assets in the room. You cannot add square footage, but you can add perceived space.
The biggest mistake we see is treating the basement as one big open box. Open is good. Undifferentiated is not.
Open Concept and Multi-Zone Layouts
An open concept plan removes interior walls so sightlines run the full length of the level. The trick is zoning within that open footprint.
Use furniture, ceiling changes, and flooring transitions instead of stud walls:
- A sectional and a rug define the lounge without blocking the view
- A counter-height peninsula separates a wet bar from the media area
- A dropped soffit or a change in ceiling height signals a new zone
- A half wall gives a gym or play area visual separation while keeping light moving
Structural columns are your friend here. Do not bury them in a wall. Wrap them in finish carpentry, make them a shelf, or let them mark a zone boundary.
Working Around Pipes, Ducts, and Structural Obstacles
The soffit, a boxed enclosure that hides ducts, plumbing, and beams, is the answer to almost every overhead obstacle. Where you can, run plumbing and HVAC in the joist bays and skip the soffit entirely. Where you cannot, keep soffits at the perimeter so the center of the room stays tall.
For the layout itself, work in this order:
- Mark the beam and duct locations on the floor
- Place the egress window and any new bathroom first, since they are the least movable
- Route the main walking path so it never crosses a media zone
- Fit furniture into what remains
If you are adding a bathroom, put it as close as possible to the existing plumbing stack. Every meter you move a drain line means cutting more slab and more money. This single decision is usually the largest cost swing in a basement project.
Basement Egress Window Requirements and Building Permits
Basement egress window requirements exist so that anyone sleeping in the space has a legal way out in a fire. If you are adding a bedroom, this is the first item on the plan, not the last.
Residential code requires an emergency escape and rescue opening in every sleeping room, including basements. The International Code Council’s IRC provisions set the standard most jurisdictions adopt, though your local building department has final say.
What the Residential Code Requires for Sleeping Rooms
The general requirements for an egress opening are:
- A minimum clear opening of 5.7 square feet (iccsafe.org)
- Minimum 24 inches of clear height and 20 inches of clear width
- A sill no more than 44 inches above the floor
- A window well with its own ladder or steps if the sill sits below grade
Do not quote these numbers to your inspector from a blog. Pull the current code for your jurisdiction and confirm with the building department before you order a window.
Permits, Inspections, and Structural Changes
A finished basement almost always needs a building permit. Finishing work, new electrical circuits, plumbing rough-in, and any structural change all trigger review. The process typically involves:
- Permit application with a floor plan and scope of work
- Rough-in inspections for framing, electrical, and plumbing before drywall
- Insulation and vapor barrier inspection
- Final inspection and certificate of occupancy for the new living area
Cutting a foundation wall for an egress window is a structural change. It needs engineering and inspection, not a weekend job, and not a place to save money.
Sequence matters more than budget in a basement. Moisture, then egress, then framing, then mechanical rough-in, then finishes. Reversing any two of those steps means tearing out finished work.
Lighting and Finishes That Brighten a Dark Basement
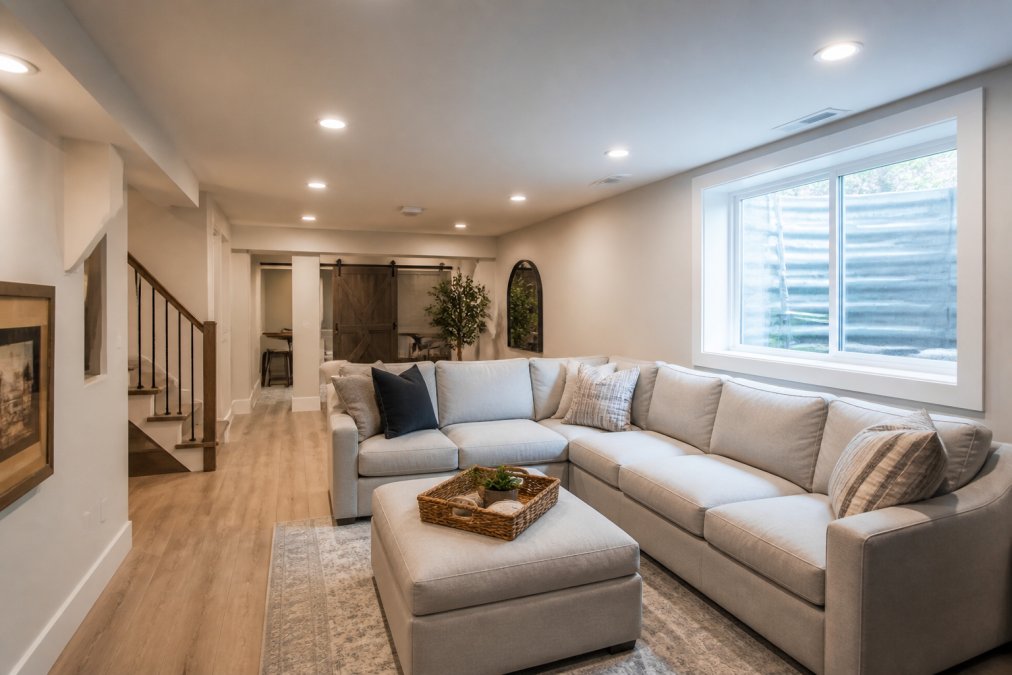
Lighting in a dark basement has to do two jobs: replace the daylight you do not have, and add warmth so the room does not feel like an office. One fixture type cannot do both.
Layered Lighting: Recessed, Task, and Accent
Build three layers, each on its own switch or dimmer.
- Ambient: LED recessed lighting in a grid that follows the ceiling bays. Space them evenly and dim them.
- Task: under-cabinet strips at a bar, vanity lights in a bath, a pendant over a game table.
- Accent: wall washers, a picture light, or LED strip in a cove or behind a media wall.
Color temperature does the heavy lifting. Warm white in the 2700K to 3000K range reads as comfortable in a living area; anything cooler feels clinical in a windowless room.
Flooring, Walls, and Ceiling Treatments for Low Light
Reflectance is the goal: light colors bounce light back into the room, dark colors absorb it and shrink the space.
- Flooring: luxury vinyl plank is the practical pick for below-grade. It handles minor moisture, installs over a flooring underlayment, and comes in light oak tones that brighten the space. Carpet works in a media room but needs a moisture-tolerant pad.
- Walls: light warm grays, soft whites, and pale greens. Keep one accent wall, not four.
- Ceiling: paint it the same light tone as the walls and keep the drywall finishing smooth. A bright white ceiling in a low room can feel heavy; matching the wall color makes the height disappear.
Do not install solid hardwood or standard laminate directly on a below-grade slab. Both swell and cup when humidity spikes, and the failure shows up months after the project is closed out.
Budgeting, ROI, and Acoustic Comfort
Two things decide whether you love the finished room: what it cost, and how it sounds. Most guides cover neither in detail, so here are the honest numbers.
What Actually Drives the Cost
A finished basement is priced by complexity, not square footage. Two basements of the same size can land thousands of dollars apart because of what is underground and overhead. The biggest cost swings, in rough order of impact:
- Waterproofing scope. A dry basement that only needs a dehumidifier is a very different project from one needing interior drainage, a new sump, and crack injection. Pin this number down first.
- Egress. Cutting a foundation wall, adding a window well, and engineering the opening is a discrete, non-negotiable cost if you are adding a bedroom.
- Bathroom additions. Distance from the existing plumbing stack is the single largest variable. Every foot you move a drain line means more slab cutting and more money.
- HVAC and dehumidification. Extending ductwork, adding a return, or installing a ducted dehumidifier is mechanical work that has to be designed, not guessed.
- Ceiling height. If ducts and beams force a drop ceiling or soffit, you pay for framing and lose headroom. Run mechanicals in the joist bays and you save both.
Get a written scope and a fixed price before work starts, and ask what is excluded. “Surprise costs once you open the walls” is the most common complaint homeowners bring us from previous contractors.
Where the Return Actually Comes From
A finished lower level adds usable living area, and appraisers generally treat permitted, code-compliant finished space as contributing value. The return is not uniform, though:
- Adding a legal bedroom or a full bath tends to contribute the most, because it changes how the space can be used and how the home is described in a listing.
- Open, well-lit living space contributes solidly, because it reads as finished square footage rather than a utility area.
- Specialty spaces, a home theater, a wine room, a gym, contribute less on resale than they cost, because the next buyer may not want them. Build them because you want them, not for a return.
- Unpermitted work does the opposite. It creates disclosure, financing, and insurance problems. Pull the permit.
A useful framing: spend on what a future buyer cannot easily change, egress, plumbing locations, moisture control, ceiling height, and treat finishes as the part you personalize.
Acoustic Insulation: The Step Almost Everyone Skips
Basements sit under the main floor, so footsteps, dishwashers, and conversation travel straight down. Sound moves through the structure itself, not just the air, which is why a little insulation in the ceiling bays rarely solves it. You have to break the direct connection between the two floors. What actually works, from most to least effective:
- Resilient channel or a suspended ceiling grid. These decouple the ceiling drywall from the floor joists above, so impact noise travels through a flexible connection instead of a rigid one. This is the single biggest improvement for footstep noise.
- Sound-absorbing insulation in the joist bays. Mineral wool or acoustic batts reduce airborne sound, voices, TV, music, but do little for impact noise alone.
- A double layer of drywall with a damping compound between the layers. The mass-plus-damping approach studios use, and it works in a basement ceiling too.
- A solid-core door on any bedroom or media room, because a hollow door is essentially a hole in the wall for sound.
- Carpet or a thick rug with a pad on the floor above cuts impact noise at the source, cheaper than treating it from below.
If you are building a home theater, treat acoustics as a design requirement, not an upgrade. A room that echoes ruins a good screen, and fixing it after drywall means tearing out drywall.
Budget for moisture control, egress, and acoustics before you budget for finishes. Those three are the items that are expensive to add later and cheap to include now, and they are the ones that decide whether the room feels like a real living space or a converted storage area.
Conclusion: Your Dark Basement Can Become Your Favorite Room
The hard part of transforming a dark basement into living space is not the design. It is the sequencing: water first, egress second, mechanical rough-in third, finishes last. Get that order right and the room takes care of itself.
Berry Basements has been doing exactly this work since 2017, and we handle the parts most contractors avoid. Our team manages waterproofing and structural changes, pulls the permits, coordinates the inspections, and works with you on a layout that fits how your family actually uses the house. You get a fixed scope, a licensed crew, and a collaborative process from first walkthrough to final punch list.
Get started with Berry Basements and turn that dark lower level into the room everyone wants to be in. Request your free estimate.
Frequently Asked Questions
How can I turn my unfinished basement into a livable space?
Start by addressing moisture control for basement renovations: install a sump pump, seal foundation cracks, and add a vapor barrier. Then plan your modern basement layout design ideas around egress windows, HVAC zoning, and electrical wiring. Finish with insulation, drywall, and flooring. A licensed contractor can manage permits and inspections to ensure the space meets residential code for a safe, comfortable living area.
What are the basement egress window requirements for a legal bedroom?
The International Residential Code requires every sleeping room to have at least one egress window. It must provide a minimum clear opening of 5.7 square feet, with a minimum width of 20 inches and height of 24 inches. The sill height cannot exceed 44 inches from the floor. Local building permits and inspections will verify compliance. Always confirm with your local building department before adding a bedroom.
How do I make a cold, dark basement feel warmer and more inviting?
Improve insulation with a high R-value, add a vapor barrier, and use a dehumidifier to keep air dry. For lighting, layer LED recessed lights with warm-toned bulbs and table lamps. Choose light paint colors and soft flooring like carpet or cork. An open concept layout with cozy seating areas helps. These steps transform a dark basement into a comfortable living space.
What are the most cost-effective ways to renovate a basement?
Focus on moisture control first to prevent future damage. Use drywall finishing and paint instead of expensive wall panels. Choose luxury vinyl plank flooring over hardwood. Add simple LED recessed lighting rather than elaborate fixtures. Keep the layout open to avoid moving plumbing. For a home theater or gym, invest in acoustic insulation and HVAC zoning. Get a free estimate from a licensed contractor to plan your renovation budget.