

Table of Contents
- Why Basement Moisture Should Decide Your Flooring
- Comparison Table: Best Basement Flooring Options for Moisture
- How to Test Concrete for Moisture Before You Install
- Waterproof Luxury Vinyl Plank Flooring and SPC Vinyl
- Tile, Epoxy, and Other Hard-Surface Options
- Basement Floor Vapor Barrier Installation and Subfloor Prep
- Flooring Materials to Avoid in a Damp Basement
- Frequently Asked Questions
Last Updated: September 11, 2026
Why Basement Moisture Should Decide Your Flooring
Water always wins. That’s the first thing any experienced basement contractor learns, and it’s why the best basement flooring options for moisture are the ones that assume water will eventually show up, not the ones that pretend it won’t. At Berry Basements, we’ve finished lower levels since 2017, and the single most common mistake we see is homeowners choosing flooring for looks before they’ve measured how much moisture their slab actually produces.
Basement moisture comes from three directions: liquid water seeping through cracks and cove joints, water vapor moving up through the concrete slab under hydrostatic pressure, and humid air condensing on cool surfaces. Each one demands a different response. A floor that handles condensation fine can still rot from below when vapor gets trapped against the slab.
Below, we’ll break down which materials survive each scenario, how to test your concrete before you spend a dollar, and which popular options you should walk away from.
Comparison Table: Best Basement Flooring Options for Moisture
The table below matches each flooring type to the moisture condition it handles best.
| Flooring Type | Cost per Sq Ft | Moisture Rating | Best For |
|---|---|---|---|
| Luxury Vinyl Plank (LVP) | $2-$7 material | Fully waterproof | General finished living space |
| SPC Vinyl | $3-$8 | Fully waterproof, rigid core | Uneven slabs, high humidity |
| Ceramic or Porcelain Tile | $5-$15 installed | Impervious | Wet basements, luxury finishes |
| Epoxy Coating | $3-$12 installed | Seals concrete permanently | Utility rooms, workshops |
| Rubber Tiles | $2-$6 | Moisture-resistant | Gyms, playrooms |
| Carpet Tiles | $2.50-$7 | Moisture-managed | Media rooms, dry basements |
| Polished Concrete | $3-$8 | Unaffected by moisture | Industrial-style spaces |
| Waterproof Laminate | $4-$14 installed | Water-resistant only | Budget wood-look areas |
| Engineered Hardwood | $6-$15 | Not waterproof | High-end, dry basements |
The pattern is clear: synthetic and hard surfaces beat organic materials every time in a below-grade space. Anything containing wood fiber or a wood core sits at the bottom of the list for a reason.
How to Test Concrete for Moisture Before You Install
You cannot pick a floor until you know your slab’s moisture vapor transmission rate. Two tests cover most homes, and both take under 24 hours.
The plastic sheet test is the DIY starting point. Tape a 2-foot square of plastic sheeting to the bare slab, seal all four edges with duct tape, and leave it for 24 hours. Condensation on the underside of the plastic means vapor is moving up through the concrete.
The calcium chloride test gives you a number. A measured dish of calcium chloride sits under a sealed dome for 60 to 72 hours, absorbing moisture from the slab (astm.org). The weight gain converts to a pounds-per-1,000-square-feet-per-24-hours figure, which is the standard your flooring manufacturer will reference in its warranty terms.
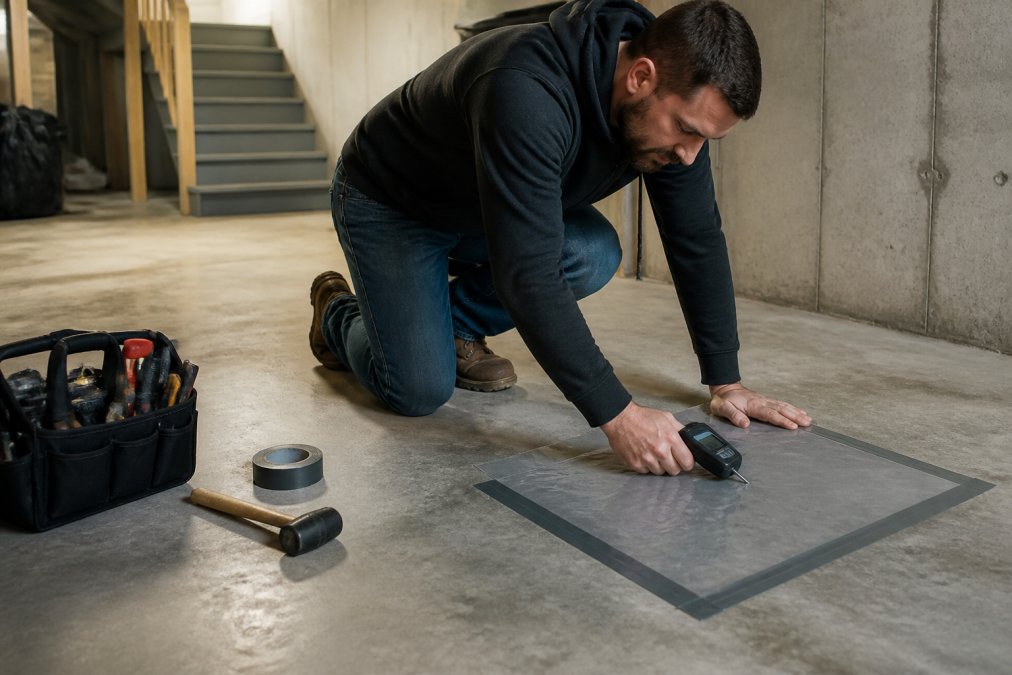
For a faster read, a handheld moisture meter pressed against the slab gives an instant relative reading. It won’t replace the calcium chloride test for warranty purposes, but it tells you quickly whether one corner of the basement is a bigger problem than the rest.
Skipping the test and installing directly over a damp slab voids almost every manufacturer warranty. When the floor cups or the adhesive releases, the replacement cost is yours, not theirs.
Waterproof Luxury Vinyl Plank Flooring and SPC Vinyl
Waterproof luxury vinyl plank flooring is the default answer for most finished basements, and the reasoning holds up. LVP is a 100% synthetic product with no wood content, so there’s nothing for mold to feed on. The click-lock system floats over the slab without adhesive, which means water that reaches the subfloor can drain rather than pool.
SPC vinyl takes the same idea and swaps the flexible core for a rigid one made from limestone and stabilizers. That rigidity matters on basement slabs, which are rarely flat. Standard LVP telegraphs every bump and dip; SPC bridges them. SPC also holds its dimensions better through temperature swings, which is why it pairs well with radiant heating.
Where LVP falls short: it feels cold underfoot without an underlayment, and the cheaper lines have thin wear layers that scuff in high-traffic zones. Spend up on the wear layer, not the pattern.
Look for a wear layer of 20 mil or higher for basements. It costs more per square foot but resists the grit and furniture drag that destroys thinner products within a few years.
Tile, Epoxy, and Other Hard-Surface Options
Porcelain and ceramic tile are the only flooring materials that are genuinely indifferent to water. The tile body is non-porous, and the surface won’t stain, scratch, or absorb anything. In a basement that has flooded before, tile is the option that survives with a mop and no replacement.
The catch is installation. Tile needs a flat, stable substrate and grout that you’ll reseal periodically. It’s also the coldest surface on this list, which matters in a Michigan winter. A thermal underlayment or in-floor heat solves that, at added cost.
Epoxy coating takes a different approach: instead of covering the slab, it becomes part of it. A liquid resin bonds directly to prepared concrete and cures into a seamless, moisture-proof surface with no joints for water to exploit. It’s the strongest choice for utility rooms, workshops, and laundry areas. It requires professional surface preparation, usually grinding or acid etching, and it gets slick when wet unless you add a texture aggregate.
Polished concrete deserves a mention for the same reason. Grinding and sealing the existing slab costs less than most people expect and produces a surface that will never warp, rot, or grow mold.
Basement Floor Vapor Barrier Installation and Subfloor Prep
Basement floor vapor barrier installation is the step that determines whether your new floor lasts five years or twenty. A vapor barrier is a sheet of impermeable material that stops moisture vapor from migrating out of the concrete and into your flooring assembly. Get this layer wrong and even a fully waterproof top surface will trap vapor against the slab, where it feeds mold on the underside of the floor and along the base of finished walls.
The right assembly depends on how much vapor your slab produces and what you’re putting on top. Three approaches cover almost every basement:
- Sheet polyethylene (6-mil or thicker): the budget standard for floating and glue-down floors. Roll it across the slab, overlap seams by at least 6 inches, and tape them with a moisture-resistant construction tape. Run the sheet up the wall a few inches behind the baseboard. It blocks vapor but does nothing for an uneven slab, so it works best over concrete that’s already flat.
- Dimpled membrane systems: a rolled plastic membrane with raised dimples that creates a continuous air gap between the slab and the floor above. Vapor that reaches the membrane condenses in the dimples and drains laterally to a sump pit or perimeter drain instead of sitting against the flooring. This is the assembly to choose when the slab has a history of seepage or when you want a drainage path built into the floor. The trade-off is height: dimpled membranes add roughly 3/16 to 1/2 inch, which matters at doorways and stairs.
- Rigid foam subfloor panels: interlocking panels with a vapor barrier bonded to the underside and a plywood or OSB wear layer on top. They add thermal insulation (typically R-3 to R-7 depending on thickness), flatten minor dips, and give you a nailable surface for the finish floor. They cost more per square foot than a roll of poly, but they solve three problems, vapor, cold, and unevenness, in one step.
Surface preparation comes first in every case. Sweep and vacuum the slab, fill cracks and divots with a patching compound, and check the floor for level. A floating floor over a slab with a half-inch dip will flex and eventually separate at the seams. If the slab slopes more than about 1/8 inch per foot toward a drain, that’s intentional and fine; if it slopes away from the drain, correct it before you build up.
One more decision point: whether to seal the slab itself before adding a barrier. A penetrating silicate sealer or a moisture-mitigating epoxy coating can reduce vapor transmission at the source, but it does not replace a vapor barrier under a floating floor. Think of it as lowering the load on the barrier, not eliminating the need for one.
The vapor barrier is not optional in a below-grade space, and it is not a substitute for fixing an active leak. If water is entering through a wall or cove joint, that comes first. A barrier traps vapor; it does not stop liquid water.
Dimpled membranes and rigid foam panels are the two assemblies most worth the upgrade in a basement that has ever taken on water. A sheet of poly is cheap insurance; a drainage-and-insulation panel is a permanent fix for the slab’s behavior.
Flooring Materials to Avoid in a Damp Basement
Solid hardwood is the worst choice for a basement, and it isn’t close. Wood expands and contracts with humidity, and a below-grade slab delivers humidity from below year-round. The result is cupping, crowning, and gaps within a season. Warping and rot follow if the moisture is persistent.
Fiberboard-core laminate sits in the same category. Even “waterproof” laminate products use a fiberboard core that swells when water reaches it, and once a plank swells, it never returns to shape. Waterproof laminate handles spills. It does not handle a damp slab.
Wall-to-wall carpet is a trap for a different reason. It feels warm and hides a wet floor, which is exactly the problem. Moisture collects in the backing and pad, and mold and mildew establish themselves before you notice a smell. Carpet tiles are a reasonable compromise because you can pull and replace individual squares, but they still need a dry slab underneath.
Engineered hardwood occupies a middle ground. Its plywood core makes it far more stable than solid wood, and it can work in a finished basement with a proper vapor barrier and controlled humidity levels. It is not waterproof, though. One flooding event and you’re replacing it.
What Actually Happens After a Minor Flood
Most guides stop at “avoid these materials.” The more useful question is what you can save when a sump fails or a supply line lets go. The answer depends on how fast you act and what’s under the floor.
- Tile and epoxy: the easiest recovery. Pull standing water with a wet vac, run a dehumidifier, and the floor is back in service. Grout may need resealing; epoxy typically needs nothing beyond cleaning. These are the only two surfaces that survive repeated wetting without replacement.
- LVP and SPC: if water reached the subfloor, lift the planks, dry the slab, and relay them. Vinyl itself doesn’t absorb water, but trapped moisture underneath will grow mold against the concrete. Planks that sat in standing water for more than a day or two may delaminate at the edges and should be replaced rather than reused.
- Rubber tiles: pull them up, wash them, dry the slab, and reinstall. Rubber tolerates water well; the adhesive or interlocking tabs are the weak point.
- Carpet tiles: individual squares can often be cleaned and dried, but any square that stayed wet for more than about 24 hours should be discarded. The backing is where mold takes hold.
- Engineered hardwood and laminate: generally a loss if water reached the core. Cupped or swollen planks won’t flatten back out, and the seams will telegraph the damage permanently.
The Health Angle Most Flooring Guides Skip
The reason to care about moisture-resistant flooring isn’t just replacement cost. It’s indoor air quality. Mold growth on a wet subfloor or carpet backing releases spores and microbial volatile organic compounds into the air your family breathes, and basements are already the lowest-airflow, highest-humidity rooms in most homes (the CDC). Choosing a surface that can’t feed mold, tile, epoxy, vinyl, rubber, removes the food source. Pairing that with a vapor barrier and a dehumidifier set to keep relative humidity under about 50% addresses the moisture itself (the EPA).
If anyone in the household has asthma or allergies, this combination matters more than the look of the floor. A waterproof surface over a dry slab is the difference between a basement you use and a basement you avoid.
If your basement has a history of seepage, the honest answer is to fix the water problem before you install anything. Berry Basements handles waterproofing and structural work as part of the renovation, so moisture mitigation and the finished floor are planned together rather than as separate projects.
Frequently Asked Questions
What type of flooring is best for a moist basement?
It depends on how wet the space gets. For minor dampness, waterproof luxury vinyl plank flooring or SPC vinyl handles humidity well and stays comfortable underfoot. If the slab sees regular seepage or hydrostatic pressure, porcelain tile, epoxy coating, or polished concrete are better because water cannot damage them. Test your concrete first, fix drainage or grading issues, and add a vapor barrier before choosing any finished floor.
What happens if a basement floods with vinyl plank flooring?
Waterproof luxury vinyl plank flooring can survive a flood if you act quickly. The planks themselves are impervious to water, but standing water can seep into seams and trap moisture underneath, which leads to mold and mildew on the subfloor. Pull up affected planks, dry the slab completely, and check the vapor barrier before reinstalling. SPC vinyl with a rigid core holds up better than standard LVP in repeated flooding.
Does basement flooring require a vapor barrier?
Yes, in most basements a vapor barrier is essential. Concrete slabs wick moisture from the soil below through a process called moisture vapor transmission, and without a barrier that dampness pushes up into your flooring, causing warping, rot, and mold. A proper basement floor vapor barrier installation uses a polyethylene sheet or a dimpled membrane under the finished floor, sealed at the seams and edges, so moisture stays in the slab instead of reaching your planks or carpet.
Is it better to have carpet or LVP in a basement?
For most basements, waterproof luxury vinyl plank flooring wins because it resists moisture, cleans easily, and does not trap odors the way carpet does. Carpet tiles make sense in finished media rooms or playrooms where warmth and sound absorption matter, especially when paired with a moisture-resistant backing. If your basement has ever flooded or smells damp, skip wall-to-wall carpet and choose LVP, tile, or epoxy instead.