

Table of Contents
- Why Basement Media Room Walls Leak Sound
- Step 1: Seal Air Gaps and Flanking Paths
- Step 2: Decoupling Basement Walls for Sound Isolation
- Step 3: Add Mass to Wall Assemblies
- Best Soundproofing Materials for Home Theater
- Step 4: Address Doors, Ceilings, and HVAC
- Moisture, Mold, and Basement-Specific Challenges
- DIY vs Professional Installation: Cost and Results
- Frequently Asked Questions
Last Updated: September 23, 2026
Why Basement Media Room Walls Leak Sound
A soundproof basement media room should feel like a private theater. Instead, homeowners hear the washing machine, traffic, and their own subwoofer rattling the floor above, a gap that comes down to how sound moves through walls.
Step 1: Seal Air Gaps and Flanking Paths
Sealing air gaps is the cheapest, most effective first step in any soundproof basement project. Sound finds the smallest opening and pours through it, so a wall with great insulation but a gap around one outlet can still leak badly.
Start by finding the gaps:
- Outlets and switches on the shared wall
- Gaps where the wall frame meets the floor and ceiling
- Holes drilled for pipes, wires, and cable runs
- Recessed light fixtures and ceiling penetrations
- The gap under and around the door
Acoustic Sealant and Putty Pads at Outlets
Acoustic sealant is a flexible, non-hardening caulk that absorbs vibration instead of cracking; standard caulk dries hard and lets sound through once it shrinks. Putty pads are moldable sheets wrapped around the back of electrical boxes, blocking sound at one of the most overlooked leak points in a basement wall.
Here is how to handle outlets and gaps:
- Turn off power at the breaker before touching any outlet.
- Remove the cover plate and pull the outlet slightly forward.
- Wrap the back and sides of the box with putty pads.
- Seal the gap between the box and drywall with acoustic sealant.
- Run a bead of sealant along the base of the wall and the top plate.
- Fill every pipe and wire penetration with acoustic caulk.
Skipping putty pads is the most common mistake in basement soundproofing. An unsealed outlet box can undo the performance of an entire wall, and you will not notice until the movie is playing and the room above hears every word.
Step 2: Decoupling Basement Walls for Sound Isolation
Decoupling basement walls for sound isolation means separating the drywall from the structural frame so vibration cannot pass directly through, the single biggest upgrade you can make. Structural bridging is the enemy: when drywall screws into studs that touch the concrete or floor above, sound travels that solid path. Decoupling breaks it.
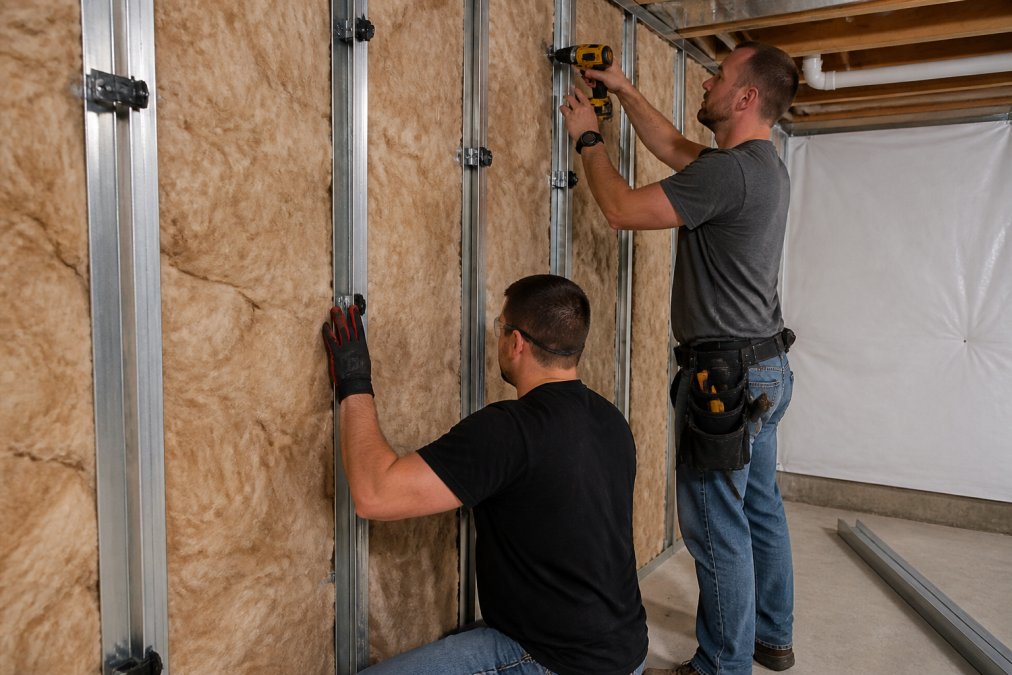
Resilient Channels vs Sound Isolation Clips
Resilient channels are thin metal strips screwed horizontally across the studs; drywall attaches to the channels, not the studs. Affordable and effective for most basement media rooms.
| Method | Best For | Cost Level | Low-Frequency Performance |
|---|---|---|---|
| Resilient channels | Standard media rooms | Lower | Moderate |
| Sound isolation clips | Home theaters with subwoofers | Higher | Strong |
| Double stud wall | Maximum isolation | Highest | Excellent |
Step 3: Add Mass to Wall Assemblies
Adding mass blocks more sound because heavy materials are harder for sound waves to move, and drywall density is the key number. Standard half-inch drywall is light; thicker, denser panels resist sound far better.
Drywall Thickness and Double-Layer Options
Five-eighth inch drywall is the standard upgrade: heavier and stiffer than half-inch, so it blocks more airborne sound. For serious isolation, use two layers with a viscoelastic damping compound between the sheets, which outperforms a single thick layer by turning vibration into heat.
Here is the layering order that works:
- First layer of five-eighth inch drywall on the channels
- A bead of damping compound across the first sheet
- Second layer of drywall, seams staggered from the first
- Acoustic sealant around all edges
Stagger the seams between your two drywall layers. If the seams line up, sound finds a straight path through both sheets. Offset them and you close that path.
Best Soundproofing Materials for Home Theater
The best soundproofing materials for a home theater balance mass, decoupling, and absorption. No single product does all three, so a good build combines them.
Mineral Wool vs Fiberglass Insulation
| Material | Sound Absorption | Cost | Best Use |
|---|---|---|---|
| Mineral wool | High, including bass | Higher | Media room walls and ceilings |
| Fiberglass | Moderate | Lower | Budget builds, upper floors |
Inside the room, acoustic panels control echo and bass traps in the corners tame low-frequency buildup. They do not stop sound leaving the room, but they make the theater sound far better.
Step 4: Address Doors, Ceilings, and HVAC
Doors, ceilings, and HVAC are the paths most homeowners forget, and often the weakest point in an otherwise solid build. A great wall means nothing if the door is hollow or the supply duct acts like a speaking tube into the room above.
How Basement Ductwork Flanks Sound
HVAC is trickier than doors or ceilings because ducts are continuous metal paths connecting rooms. In a basement media room, supply and return trunks often run through the joist bay directly above the room, and every branch takeoff, boot, and register is a hole in your acoustic envelope. Sound moves through ductwork two ways: airborne noise travels through the open duct channel, and structure-borne vibration travels along the sheet metal, radiating into adjacent rooms.
Here is how to address each path:
- Line the duct interior near the room. Internally lined duct or a flexible lined connector absorbs mid- and high-frequency sound before it enters the trunk, the most effective duct fix for voice and dialogue leakage.
- Add flexible duct sections. A short run of insulated flexible duct between the rigid trunk and the room boot breaks the vibration path along the metal. Keep it as short as code and airflow allow; long flex runs hurt airflow and can sag.
- Install lined elbows or baffles at the room connection. A lined 90-degree elbow forces sound to bounce off absorptive material before it travels down the trunk. Two offset elbows in series beat one.
- Seal the boot to the drywall. The gap around a supply boot or return grille is a direct air leak. Seal it with acoustic sealant on the back side and use a gasketed grille.
- Consider a dedicated return. A shared return serving the media room and the rest of the basement is a direct sound path. A dedicated return with a lined plenum and baffle isolates the room far better.
- Do not block airflow. Any duct treatment must preserve the system’s design static pressure. Oversized baffles or long flex runs can starve the room of air, causing comfort complaints and, in some cases, code issues with combustion appliances sharing the space.
Never seal a return air path completely to stop sound. A media room needs airflow for comfort and for any gas appliance in the basement. Use lined baffles and gasketed grilles to reduce noise while keeping the system balanced.
Doors, Ceilings, and HVAC Checklist
- Solid core or acoustic door with full perimeter seals and a sweep
- Second drywall layer on the ceiling, decoupled where impact noise matters
- Lined duct section or flexible connector at the room connection
- Lined elbow or baffle at the supply and return
- Gasketed grilles and sealed boots
- Dedicated return where the budget allows
- Airflow verified after treatment
The weakest path sets your result. If your walls are excellent but your door is hollow or your return duct is a straight pipe to the room above, you hear everything through that path. Fix every path, not just the biggest one.
Moisture, Mold, and Basement-Specific Challenges
Moisture separates basement soundproofing from every other room in the house. Sealing a wall tight without managing water traps damp air and invites mold, the gap most soundproofing guides skip, and the one that can turn a finished media room into a tear-out. A soundproofed wall hides the concrete behind it, so by the time a musty smell reaches the room, the drywall paper and wood studs may already be affected.
Test Before You Close the Wall
The fix starts before any acoustic material goes up. Confirm the space is dry, then keep it dry.
- Check for bulk water first. Efflorescence (white mineral staining), dark staining at the base of the wall, or a chalky residue on the concrete all point to water moving through the wall.
- Run a simple moisture test. Tape clear plastic sheeting to the concrete for 24 to 48 hours. Condensation on the underside suggests moisture moving through the wall from outside; condensation on the room side suggests humid interior air, a different fix.
- Measure humidity. A cheap hygrometer left for a few days shows whether the basement stays in range. Most practitioners aim to keep a finished basement below roughly 50 to 55 percent relative humidity, where mold growth is much less likely.
- Fix drainage and grading outside. Gutters, downspout extensions, and soil sloping away from the foundation solve more basement moisture than any interior product, the step homeowners skip because it is not part of the media room build.
- Address interior water management. A dehumidifier sized for the square footage, a sump system if the space floods, and a vapor barrier strategy appropriate to the wall type all belong in the plan before drywall.
Material Choices That Resist Moisture
Not every soundproofing material belongs in a basement. The assembly has to manage both sound and moisture.
- Use moisture-resistant drywall. Paperless or moisture-resistant gypsum board holds up far better than standard board if humidity spikes; standard drywall paper feeds mold.
- Choose mineral wool over fiberglass in damp-prone areas. Mineral wool is naturally moisture-resistant, does not support mold growth the way some organic-faced products can, and holds its acoustic performance if it gets damp and dries out.
- Avoid mass loaded vinyl directly against concrete. MLV is a vapor barrier, so trapping it against a damp wall creates a mold pocket. Use it on the room side of the assembly, not against the foundation.
- Keep the base of the wall open. Leave a small gap at the bottom plate or use a capillary break so the wall can dry. Do not run acoustic sealant along the floor line on a wall with any moisture history.
- Use closed-cell or moisture-tolerant sealants. Acoustic sealant is fine on the room side, but any sealant touching concrete should be rated for masonry and moisture.
Why This Matters for Sound
Moisture and sound performance are linked. A damp wall cavity changes how insulation performs, and mold-damaged drywall loses mass and stiffness. A wall that leaks water will eventually leak sound too, because the repair means opening the assembly and starting over.
If the basement has ever flooded or shown efflorescence, treat waterproofing as the first line item in the budget, not an add-on. Soundproofing materials installed over a wet wall are money spent twice.
A soundproofed wall hides moisture problems until they are expensive. Test the wall, fix the water, choose moisture-tolerant materials, and leave a drying path. Do this before you hang the first sheet of drywall.
DIY vs Professional Installation: Cost and Results
DIY soundproofing can work for small jobs, but full media room walls usually favor a pro. The gap comes down to details that are hard to get right on your own.
Hiring a pro makes sense when the job involves:
- Decoupling with clips or a double stud wall
- Electrical work around outlets and boxes
- HVAC modifications for duct noise
- Moisture and waterproofing problems
- Structural changes to the frame
Frequently Asked Questions
How can I soundproof my basement walls without removing drywall?
You can add mass and damping without full demolition. Apply a viscoelastic damping compound directly to the existing drywall, then add a second layer of 5/8-inch drywall with acoustic sealant at the edges. Seal outlets with putty pads and add door sweeps. This approach improves sound transmission class but won’t match full decoupling. For severe noise, removing drywall to install resilient channels or isolation clips delivers better results. A contractor can assess whether your current wall assembly has enough mass to make surface treatments worthwhile.
What materials are best for blocking sound in a home theater?
The best soundproofing materials for home theater combine mass, decoupling, and absorption. Mineral wool insulation outperforms fiberglass for low-frequency absorption. Mass loaded vinyl adds density without thick walls. Viscoelastic damping compound reduces vibration between drywall layers. Resilient channels or sound isolation clips break structural bridging. Use acoustic sealant at all edges and putty pads behind outlets. For basements, choose moisture-resistant products to prevent mold. A layered approach with these materials blocks airborne sound and reduces impact noise from ceiling joists.
Is it necessary to decouple walls for home theater soundproofing?
Decoupling is the most effective way to stop sound transmission through basement walls. Without it, vibrations travel directly through structural bridging from one side of the wall to the other. Resilient channels or sound isolation clips create a gap that breaks this path. If your media room shares walls with bedrooms or living spaces, decoupling basement walls for sound isolation is worth the investment. For less critical rooms, adding mass and sealing air gaps may be sufficient. A contractor can test your current STC rating and recommend the right level of decoupling.
How do I address sound flanking in a basement media room?
Flanking noise travels through paths other than the wall you treated, such as ceiling joists, ductwork, electrical outlets, and shared flooring. Seal all air gaps with acoustic caulk. Wrap ductwork with insulation or install flexible duct connectors. Use putty pads on electrical boxes. Add a solid core door with door sweeps and seals. If flanking persists, check for structural bridging at wall-to-floor and wall-to-ceiling junctions. In basements, moisture barriers and vapor retarders can also create flanking paths if not sealed properly.