

Last Updated: October 28, 2026
Quick Summary
Preventing mold in finished basements means fixing the water source first, then keeping relative humidity between 30% and 50% with a correctly sized dehumidifier. Seal foundation cracks, grade soil away from the house, and insulate cold walls so moisture cannot condense behind the drywall.
- Mold needs spores, food, warmth, and moisture; you can only control the moisture.
- Keep downspouts discharging water at least 6 feet from the foundation.
- Match dehumidifier capacity to square footage, such as a 50-pint unit for 500-1,000 sq ft.
- Never press fiberglass batts directly against concrete; they stay wet and invite mold.
- Do a full moisture walkthrough twice a year, in spring and fall.
Table of Contents
- Diagnose the Moisture Source Before You Choose a Fix
- Step 1: Seal Foundation Cracks and Stop Water Intrusion
- Step 2: Set Basement Dehumidifier Requirements for Your Square Footage
- Step 3: Insulate and Build Wall Assemblies That Resist Condensation
- Step 4: Handle Moisture Control for Basement Renovations Before Drywall Goes Up
- Step 5: Spot the Signs of Mold Behind Finished Walls Early
- Step 6: Run a Room-by-Room and Seasonal Inspection Checklist
- Step 7: Maintain Humidity, Airflow, and Drainage Year-Round
- Frequently Asked Questions
Diagnose the Moisture Source Before You Choose a Fix
Preventing mold in finished basements starts with one question: is water getting in, or is moisture already in the air?
Mold needs four things to grow: spores, food, warmth, and moisture. You can’t remove spores or food from a basement. You can control moisture.
The U.S. Environmental Protection Agency’s mold guidance is blunt about this: fix the water problem first, or mold comes back.
Water Coming In vs. Water Already in the Air
Water intrusion means liquid water entering through cracks, seams, or gaps. You’ll see staining, efflorescence (white powder), or damp spots along the base of walls.
Condensation means humid air meeting a cold surface. You’ll see fogged windows, rust on metal, or moisture on pipes and wall bottoms.
The difference matters: water coming in needs sealing, drainage, and grading; water in the air needs ventilation, insulation, and humidity control. Many basements have both.
Step 1: Seal Foundation Cracks and Stop Water Intrusion
Sealing cracks is the first line of defense and cheap compared to repairing water damage later. Start outside, then work inward.
- Check gutters and downspouts. Water should exit at least 6 feet from the foundation.
- Fix grading. Soil should slope away from the house, not toward it.
- Seal visible cracks in foundation walls with hydraulic cement or a polyurethane injection kit.
Watch out: sealing a crack from the inside while the outside still funnels water into it just traps moisture in the wall. Fix the source first.
Step 2: Set Basement Dehumidifier Requirements for Your Square Footage
Basement dehumidifier requirements depend on square footage, ceiling height, and how damp the space runs. A small unit in a large basement runs nonstop and never catches up.
Here’s a practical starting point:
| Basement Size | Typical Dehumidifier Capacity | Notes |
|---|---|---|
| Up to 500 sq ft | 30-pint unit | Tight, closed rooms |
| 500-1,000 sq ft | 50-pint unit | Most finished basements |
| 1,000-1,500 sq ft | 70-pint unit | Open layouts, humid climates |
| Over 1,500 sq ft | Two units or a ducted system | Split by zone |
Run the unit with a built-in humidistat set to keep relative humidity between 30% and 50%. Above 60%, mold growth accelerates.
Empty the bucket or plumb a drain line. A dehumidifier that shuts off when full does nothing while you’re at work.
Step 3: Insulate and Build Wall Assemblies That Resist Condensation
Cold foundation walls are condensation magnets. Warm, moist basement air hits them and releases water right where mold loves to grow. In a finished basement, the wall assembly is where prevention is won or lost, because once drywall covers the framing, every mistake is hidden.
The goal is a wall that stays warm on the inside face and can dry in at least one direction, which means controlling thermal resistance, vapor movement, and drainage at once.
The Assembly That Works
A reliable sequence for a poured concrete or block wall, from the concrete outward:
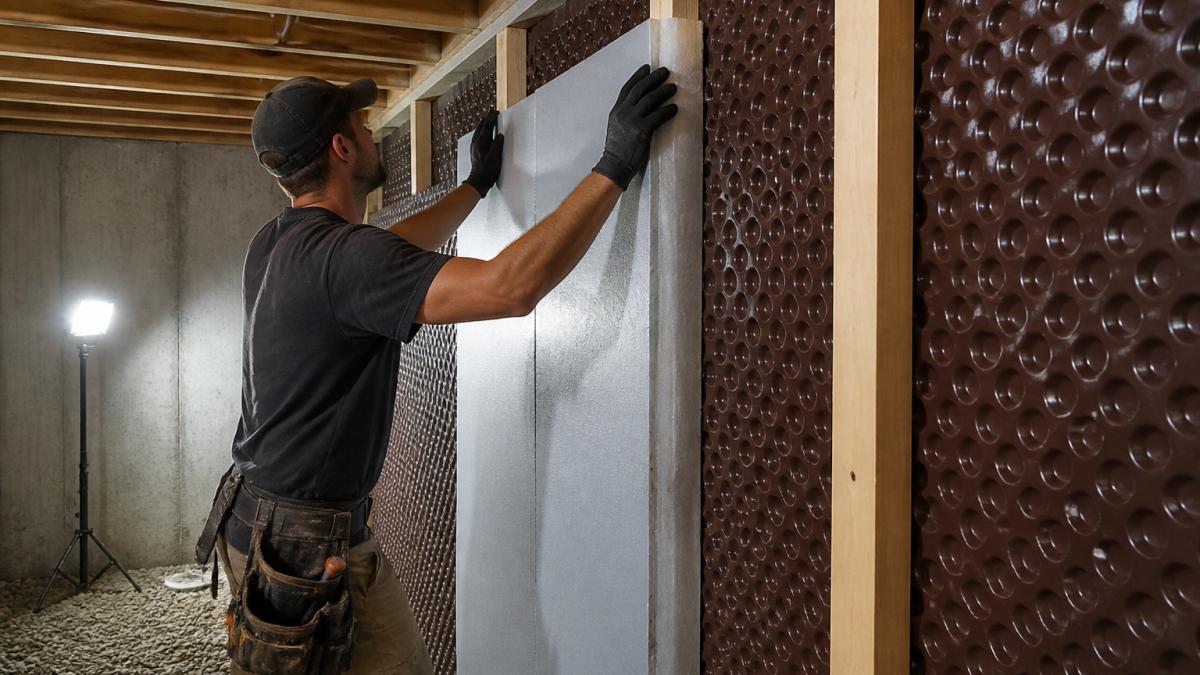
- Drainage plane (if the wall sees any seepage): a dimple mat or drainage board against the concrete, with a termination at the footing or an interior drain. This gives liquid water a path down and away instead of into the framing.
- Rigid foam insulation: extruded polystyrene (XPS) or expanded polystyrene (EPS) board set directly against the concrete or drainage mat. Seal every seam and the perimeter with canned foam or compatible tape. Foam keeps the interior surface warm enough that moisture does not condense on it, and closed-cell foam also acts as a vapor retarder.
- Framing: wood studs set out from the foam, not pressed into it. Pressure-treated lumber at the bottom plate, with a capillary break (a sill gasket or a strip of foam) between the plate and the slab.
- Cavity fill (optional): unfaced fiberglass or mineral wool in the stud bays only if the foam is thick enough to keep the dew point inside the foam. If you are unsure, leave the cavity empty; an empty, dry cavity outperforms a wet insulated one.
- Drywall: moisture-resistant drywall held a half inch or so off the floor so it cannot wick water from the slab.
Common Installation Mistakes That Trap Moisture
- Fiberglass batts pressed directly against concrete. They soak up moisture and stay wet, and they provide almost no path for drying. This is the single most common finished-basement failure.
- A vapor barrier on both sides of the wall. Two vapor retarders sandwich the framing and trap any moisture that gets in. Pick one side to retard vapor and let the other dry.
- Poly sheeting stapled over the face of the framing with no insulation behind it. Warm interior air reaches the cold poly and condenses on it, wetting the cavity from the inside.
Material Trade-Offs
- XPS vs. EPS: XPS has higher R-value per inch and lower moisture absorption; EPS is cheaper and more vapor-open. Either works if seams are sealed and thickness is adequate.
- Closed-cell spray foam: excellent air and vapor control and it fills irregular gaps, but it is more expensive and must be installed by a trained applicator. It is a strong choice for rim joists and irregular foundation surfaces.
- Rigid foam plus framing vs. insulated concrete forms or pre-finished panels: panel systems speed installation and can make future inspection easier, but they still depend on a sealed, drained wall behind them.
For more ways to keep insulation costs down, see our guide to cost effective basement insulation methods.
Step 4: Handle Moisture Control for Basement Renovations Before Drywall Goes Up
Moisture control for basement renovations decides whether your finished basement lasts five years or thirty. Once drywall covers the framing, every problem becomes expensive to find.
Before the first sheet goes up:
- Test the concrete for moisture with a plastic sheet test or a calcium chloride kit.
- Confirm the dehumidifier and drainage are working.
- Photograph every wall cavity with a tape measure in frame, so you know what’s behind the drywall later.
Vet your contractor carefully at this stage: moisture details get skipped when crews rush to close walls, and our article on signs of a bad basement renovation contractor covers what to watch for. For flooring that survives a damp slab, check our roundup of basement flooring options for moisture.
Step 5: Spot the Signs of Mold Behind Finished Walls Early
Signs of mold behind finished walls usually show up before you see a single spore. Catching them early saves the wall.
Look for:
- A musty odor that doesn’t clear after airing the room out
- Soft or bubbling drywall tape
- Dark staining near baseboards or window corners
If you smell mustiness, cut a small inspection hole in an inconspicuous spot; a cheap borescope camera lets you look inside the cavity without tearing out a full wall.
Wall finishes that allow inspection help here. Our guide to alternatives to traditional basement wall paneling covers options that make moisture problems easier to spot.
Step 6: Run a Room-by-Room and Seasonal Inspection Checklist
Mold prevention is a habit, not a one-time project. Do a full walkthrough twice a year, in spring and fall, and a five-minute spot check monthly in the wettest months.
Measure Before You Look
A visual check misses moisture that hasn’t stained anything yet. Use a hygrometer (a cheap digital humidity and temperature meter) and record readings rather than guessing.
- Where to measure: each finished room, near the coldest exterior wall, inside any closet or storage nook on an exterior wall, and near the dehumidifier intake.
- What to record: relative humidity, temperature, and time of day, at the same time each check so you compare like with like.
- How to interpret: keep relative humidity between 30% and 50%; above 60%, mold growth accelerates. A room reading 10 points higher than the rest usually points to an air-sealing or insulation gap on that wall.
Photograph your hygrometer readings each check. A dated photo log turns a vague “it felt damp” into a trend you can act on, and it is useful evidence if you ever need a contractor or an insurer to take the issue seriously.
Room-by-Room Checklist
Main finished room
- Hygrometer reading recorded
- Base of every exterior wall checked for staining, bubbling tape, or soft drywall
- Furniture and boxes pulled a few inches off exterior walls; check the wall behind them
Storage closets and under-stair areas
- Hygrometer reading recorded (these often run wettest)
- Stored items checked for mustiness; cardboard and paper checked for softness
- Air gap maintained between stored goods and exterior walls
Bathroom and laundry areas
- Under-sink cabinet checked for leaks and staining
- Supply lines and shutoff valves checked for corrosion or weeping
- Exhaust fan confirmed to move air (tissue test at the grille)
Mechanical and utility area
- Water heater base and nearby floor checked for rust or dampness
- Sump pit checked; pump tested by pouring a bucket of water into the pit
- Condensate lines and drain pans checked for clogs
Windows and doors
- Window wells checked for standing water and debris
- Frames and sills checked for condensation, peeling paint, or soft wood
- Weatherstripping and seals checked for gaps
Seasonal Timing
- Spring: after the thaw and the first heavy rains, check for water intrusion, efflorescence, and sump activity. This is when groundwater problems show up.
- Summer: the highest humidity season in most basements. Check dehumidifier performance, condensate drainage, and condensation on cold surfaces.
- Fall: before heating season, confirm grading and downspouts are clear of leaves, and check that exterior water still discharges well away from the foundation.
Airflow matters too: leave a few inches between furniture and exterior walls, since stuffy corners are where mold starts.
Step 7: Maintain Humidity, Airflow, and Drainage Year-Round
Keeping a finished basement dry is mostly maintenance. Set it and forget it doesn’t work.
- Keep relative humidity below 60% at all times, ideally 30-50%.
- Run a small fan or the HVAC fan on low to keep air moving.
- Clean the dehumidifier filter monthly.
If humidity stays high even with a dehumidifier running, the basement may need dedicated air handling. Our article on signs your basement needs a separate HVAC system explains when a ducted system makes more sense than a portable unit.
Preventing mold in a finished basement comes down to controlling moisture before it settles in: sealing water out, keeping the air dry, and building walls that don’t trap condensation. Berry Basements has served homeowners since 2017.
Frequently Asked Questions
How can I prevent mold from growing in my finished basement?
Keep relative humidity below 60 percent, seal foundation cracks, and run a properly sized dehumidifier. Preventing mold depends on cutting off moisture before it reaches drywall and framing. Check the rim joist, window wells, and plumbing penetrations for leaks. A hygrometer costs little and tells you whether your current setup is actually working.
What are the early warning signs of mold growth behind basement walls?
A musty odor that lingers after cleaning is the most common sign. Others include soft or bubbling drywall, discolored baseboards, peeling paint, and allergy symptoms that ease when you leave the house. Because finished walls hide the cavity, use a moisture meter on drywall and framing. If readings stay elevated after a rain, open a small section for inspection rather than waiting for visible mold.
Do I need a dehumidifier for a finished basement?
Most finished basements do, especially in humid summers. A dehumidifier sized for your square footage keeps relative humidity below 60 percent, which stops condensation on cool concrete and framing. Look for a unit rated for the space, with a hose drain so you do not empty it daily. Pair it with a hygrometer so you can confirm the unit is holding target levels rather than guessing.
Will insulation alone prevent mold in a finished basement?
No. Insulation controls condensation on cold surfaces but does nothing about bulk water. Seal cracks and fix grading first. If you are planning a renovation, address moisture control for basement renovations before drywall goes up so the assembly can dry.
